
The Layers Panel
Pretty well everything that can be done with layers is done via the Layers panel. I strongly recommend that this panel is always available in your workspace. At any time, you can open it by pressing f7 or by selecting Layers from the Window menu.
Filter
If you are working on an image with many layers, you can filter which layers will appear in the panel by clicking any of these icons. I find it very confusing to have ‘missing’ layers, so I never use this option.
Blend Modes
Click the arrow to open a dropdown which will offer a variety of blend modes. These modes can be used to achieve a variety of effects such as lightening, darkening and adding contrast. When a blend mode is selected, the pixels in the selected layer are blended with the layer or layers below using different algorithms.

For example, the ‘Lighter Than’ mode will only show pixels which are lighter than the pixels in layers below. Guess what ‘Darker Than’ does!
Lock
Use the icons to lock different aspects of your layers. The options are:
- lock transparent pixels: this means you will only be able to edit visible pixels.
- lock image pixels: this prevents any changes using the painting tools. Pixels can still be moved or transformed.
- lock position: this prevents pixels from being moved or transformed.
- lock auto-nesting: this prevents auto-nesting into and out of artboards and frames. This is only useful if you use artboards and frames which I don’t!
- lock all: this means you won’t be able to edit this layer in any way at all.
I don’t find the Lock options particularly useful so I use them very rarely.
Layers
This is where the layers in your image are displayed.
Menu
This gives access to a wide range of layer operations. (See below)
Opacity
This determines the visibility of the layer. A value of 100% means the layer is fully visible. Smaller values will make the layer semi-transparent. Opacity can also be used to modify the strength of effect of adjustment layers.
Fill
In most situations this will have the same effect as Opacity. However, if you have applied a layer style, Fill will adjust the opacity of the original layer, but will not affect the opacity of the layer style.
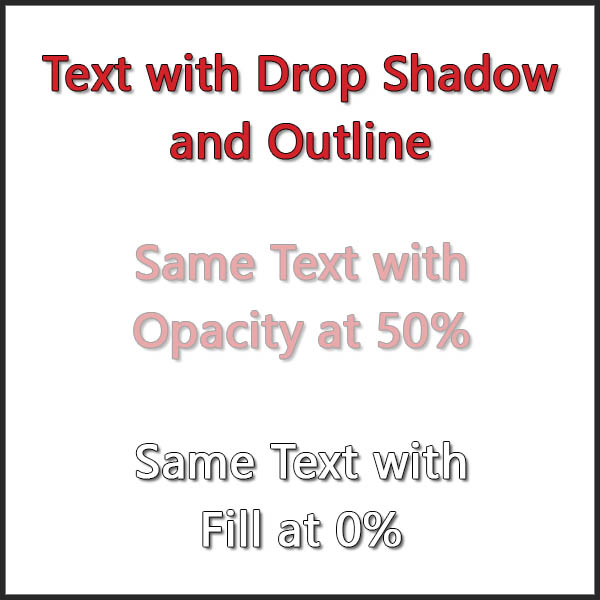
The example opposite illustrates the difference between Opacity and Fill.
- The first text layer is displayed with both Opacity and Fill at 100%.
- The second text layer has Opacity set at 50%; both the text and the layer styles display with 50% transparency.
- The third text layer has Fill set at 0%; the original text is completely transparent and only the layer styles are visible.
A: Link Layers
As the name suggests, this can be used to link two or more layers. Multi-select layers by holding down the CTRL key and clicking on each of the layers you wish to link. Then click the Link icon. Linked layers can be moved or transformed together. Painting tools will only affect the active layer.
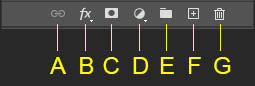
Bottom of Layers Panel
B: Add Layer Effects
Clicking this opens a dropdown with a variety of options. Clicking on any of the options will open the Layer Style dialogue. This dialogue can also be opened by double-clicking a layer’s thumbnail. Layer Styles are covered in more detail below.
C: Add Layer Mask
Layer Masks are very powerful as they are one of the main tools for targeting specific areas of your image. They will be covered in detail in Module 8.
D: Add Adjustment Layer
Click this to open a dropdown listing all 16 adjustment layer tools. Several of these have already been described in previous modules.
E: Create a layer group
Layers can be consolidated in a layer group. To do this, multi-select all the layers you wish to include and click this icon. As with layers, it’s a good idea to name groups. Groups have several advantages:
- they are a good way to organise different sections of your editing process. For example, any layers where only the sky is being edited can be combined in a group.
- an adjustment layer can be applied and clipped to a group. This means that all layers in that group will be affected, but the adjustment will have no effect on other layers further down the stack. For example, if your group is composed of several sky layers, these can all be adjusted together.
- all the layers in a group can be moved or transformed as a single unit.
F: Create a new layer
Clicking this creates a new, empty layer directly above the active layer.
G: Delete Layer
This deletes the active layer or all selected layers. A layer or any combination of selected layers can also be deleted by dragging and dropping on the bin icon.
Layer Operations
Each layer has two distinct areas- the layer icon and the layer background where the name appears. Right-clicking on either of these areas will display different menus. Yet another menu is displayed if you click on the bars icon at the top left of the Layers Panel. (See graphic at the top right of this page.)
Duplicate Layer
An exact copy of any layer can be made by right-clicking the layer background and selecting ‘Duplicate Layer’. Pressing CTRL J has the same effect.
Rename Layers
Double-click on any layer name to rename it.
Re-order Layers
Layers can be re-ordered by dragging and dropping.
Clip Layers
As we’ve already found out, adjustment layers can be clipped to an image layer so that it only affects that layer. It’s also possible to clip other types of layers for other reasons. For example, if you have a shape layer, say a rectangle, immediately below an image layer, they can be clipped together. In this example only that part of the image layer which is bounded by the rectangle will be visible. This is called a clipping mask. To create a clipping mask, right-click on the background area of the layer and select ‘Create Clipping Mask’. To remove a clipping mask do exactly the same and select ‘Release Clipping Mask’. You can also do this by holing the ALT key and moving your cursor between the layers you wish to clip. The cursor icon will change from a hand to a square with a down arrow. Click when it changes to clip the layer. If the down arrow has a slash through it, this will unclip the layer.
Merge Layers
Layers can be merged in several ways:
- Merge selected layers: this merges all selected layers into a single layer. Be aware that if you merge adjustment layers only, the resulting layer will be empty and the adjustments will be lost.
- Merge down: this merges the active layer with the layer immediately below.
- Merge Visible: this merges all visible layers into a single layer. Hidden layers will be retained.
- Flatten Image: this merges all layers into a single background layer. Hidden layers are discarded.
Right-click on the layer background to see the options for merging.
There is one more way of merging layers which is highly useful. It doesn’t appear on any menus and is only available as a keypress. To use this, press SHIFT CTRL ALT E simultaneously and all visible layers will be merged to a new layer. This differs from Merge Visible and Flatten Image in that all other layers are retained. I often use this to create a consolidated version of some or all other layers. Examples of its use might be to consolidate groups of layers such as sky layers or to consolidate all layers to add a vignette.
Rasterize Layers
This converts different types of layer such as Smart Object layers or Text layers to ordinary image layers. Layers with associated layer styles can also be rasterized so the style is consolidated into the layer.
Layer Styles
Layer Styles are more useful for graphic art than they are for photography. They allow for the addition of elements such as bevels, drop shadows, glow and a variety of overlays (colour, gradient and pattern). Multiple styles can be added to any layer. They are often used with text or shapes.
The Layer Styles dialogue can be opened either by clicking the fx button at the bottom of the Layers panel (see B above) or by double-clicking on the layer background.
Any layer with an applied style will display a dropdown with the styles listed. Layer Styles can be copied and pasted to other layers using menu commands. They can also be deleted via the dropdown menu or by dragging the styles to the bin.
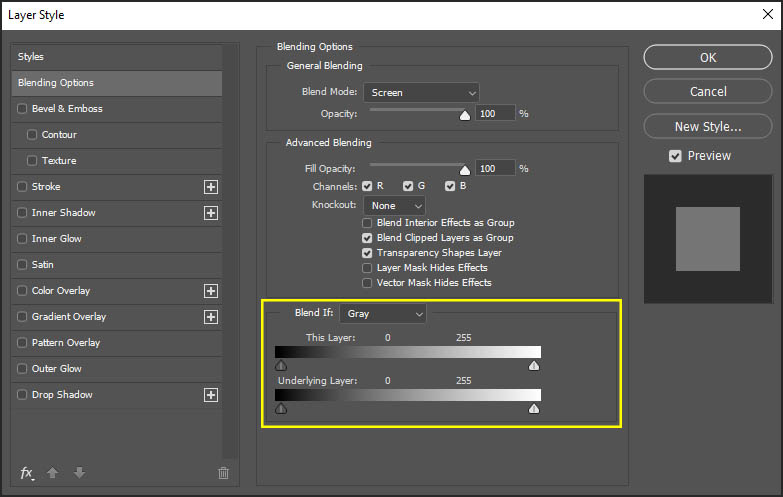
There is one additional feature – Blend If – which can be very useful when blending layers. This function is highlighted in the image below right. Blend If allows two layers to be blended by using the sliders to hide or reveal different tonal areas of the two layers being blended. It can be used with two image layers or with an image layer and an adjustment layer above. It’s not the easiest tool to use so I’ve not covered it’s use in any detail.